Introduction
Hello, my name is David White. I have recently completed four years of study towards an MEng in Computer Science at The University of Manchester for which I was awarded a first-class honours grade. This page showcases a selection of some of the projects I have developed. This includes both personal projects and university assignments.
To Top
Music Bingo Game Generator
Project Description:
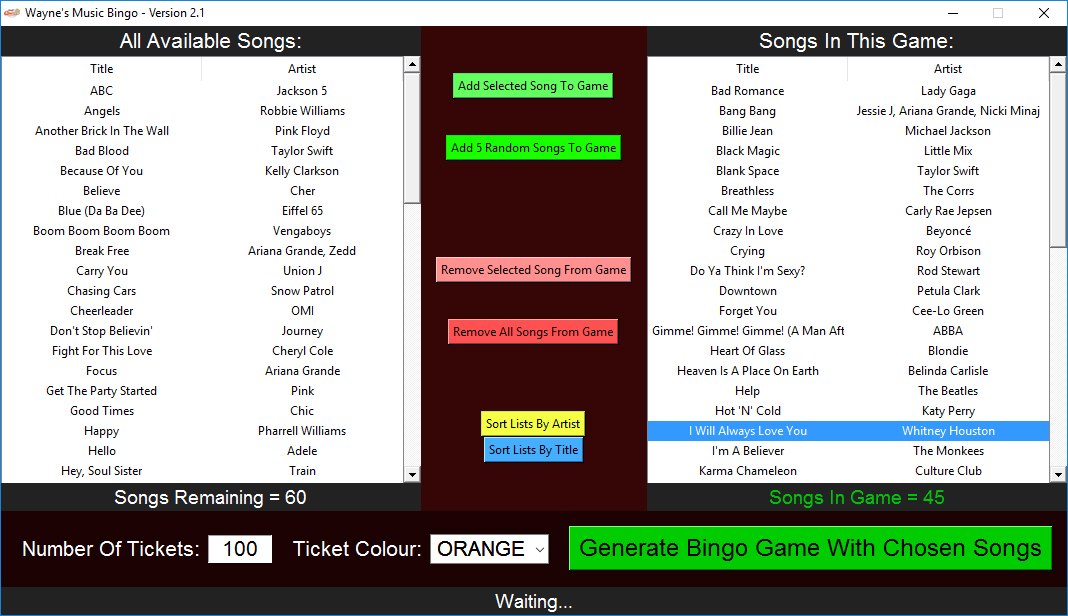
Music Bingo is a variation on normal bingo where the numbers are replaced with songs which the players must listen out for. This program allows users to generate their own games of Music Bingo using their own music clips. This is a personal project I wanted to make as there are some interesting problems which need to be solved - including ensuring all tickets are unique, generating PDFs, editing and generating MP3 files, reading and processing ID3 tags and other game issues such as ensuring
the game is exciting (by making the win as late as possible) and ensuring only one winner. Although this started as a personal project, it is now currently in use every week at four quiz nights across the North West - more information
below.
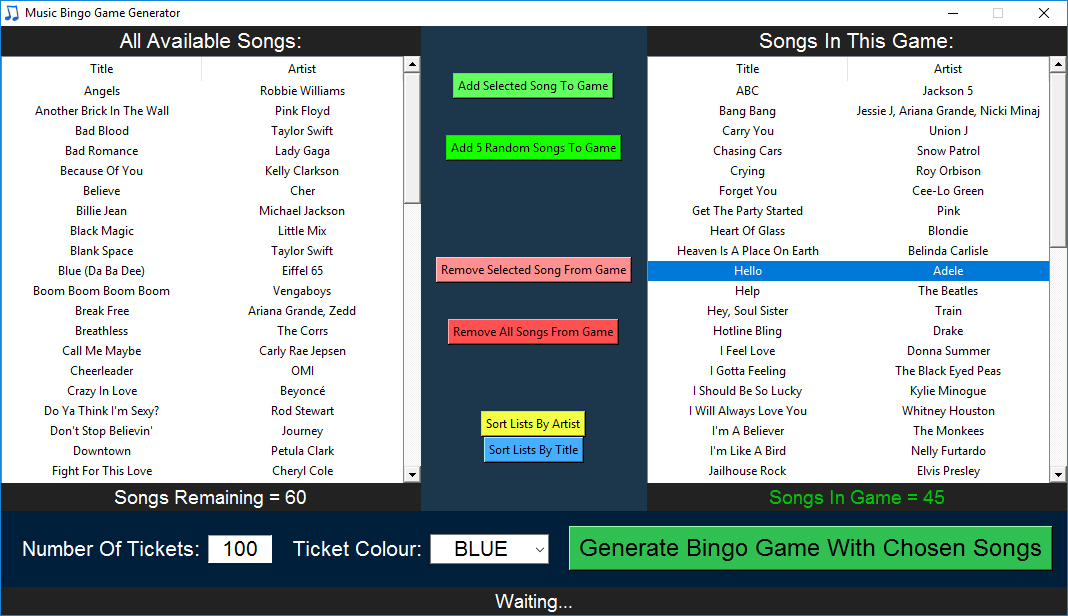
Before generating any bingo games the user must first get many song clips (around 10-15 seconds) and label them with the correct ID3 tags (Title and Artist) for that clip. These clips must then be placed
in the Clips folder. When the user opens the program, the list on the left will show all the possible songs they have to choose from (with the titles and artists being read from each file's ID3 tags). The user can then select as many songs as they
want to be in the game they are generating (a good number is around 45 songs - which typically generates around a 10-minute game). Once the tracks have been chosen, the user must specify the number of tickets they want to generate in the text entry
box in the bottom left of the program and then click the generate game button.
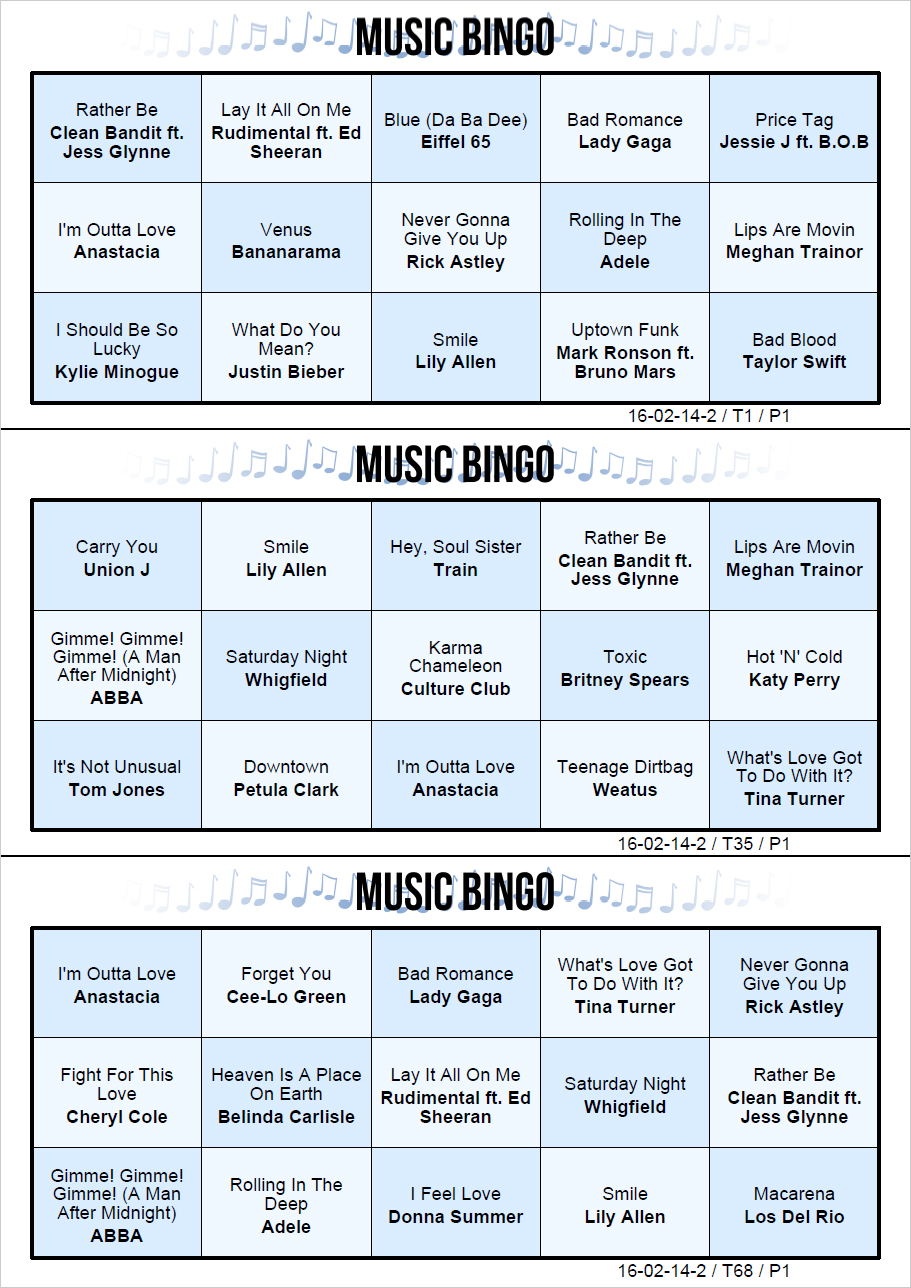
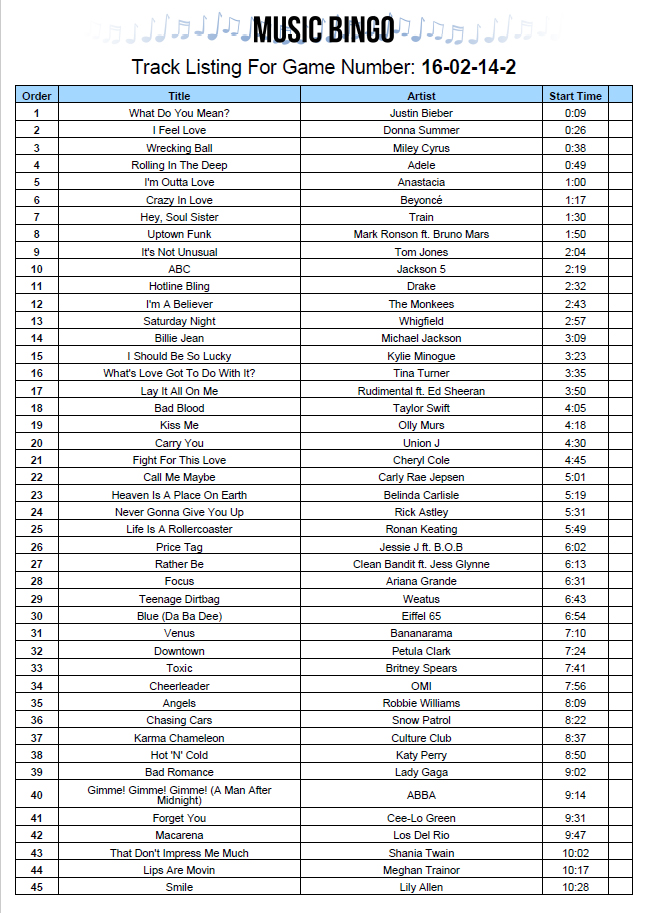
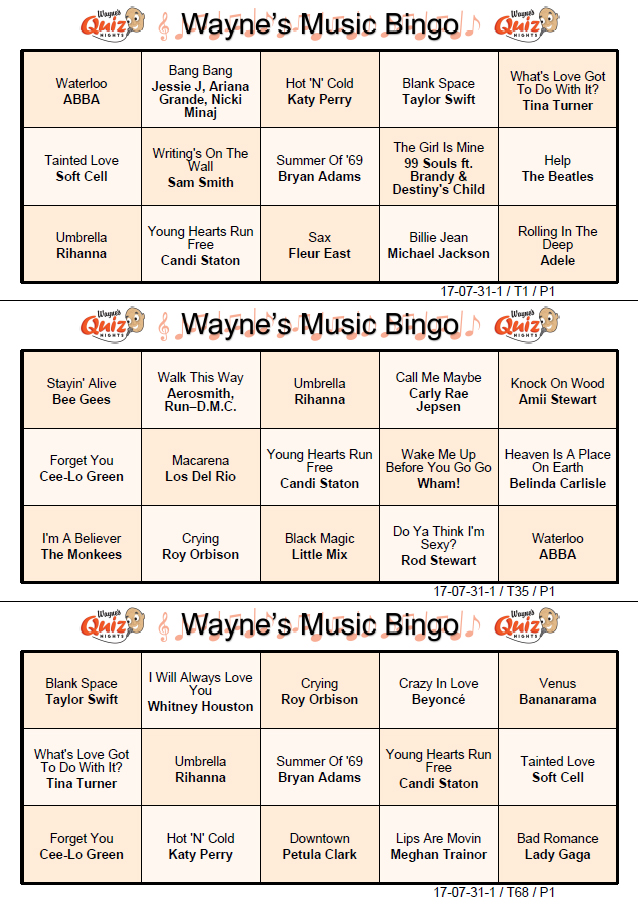
After a short wait, a folder will open with all the generated files (as shown below). In the folder, there is a PDF file of all the bingo tickets that have been
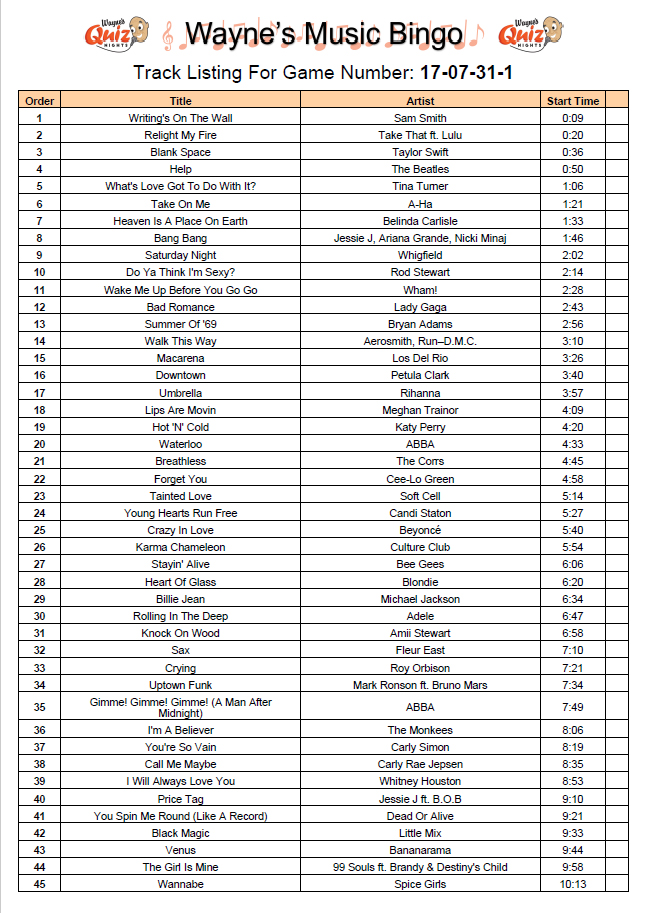
generated (example page shown below). There will also be a generated MP3 file which has all the selected tracks edited into a random order with a 'swoosh' sound effect transition between each clip and a 5-second countdown at the start (due to copyright
restrictions, an example of a generated MP3 cannot be made available here). To accompany the MP3 there will also be another PDF file which will show the order of when each of the tracks is played on the generated MP3 (example shown below) - this
allows whoever is running the game to keep track of the current point in the game.
The image below shows the three files automatically generated by the program:

Click on each of the three images below to view them larger and find out more:
Regular usage by Wayne's Quiz Nights:
Although this project was initially created as a personal project, shortly after completing the first working version of the application (January 2016) I received interest from Wayne Jenkins, who runs Wayne's Quiz Nights. Wayne runs four quiz nights a week at multiple venues across the North West and was interested in using the program I created to make games to use before each of his quiz nights. After making a few changes to the code and adding his branding to the tickets and track listing sheet, I gave Wayne access to the application and shortly after, he began using it at his quiz nights with great success.
Below is a testimonial from Wayne describing his success with the application:
I now get people coming along just for the music bingo, which is also improving the pubs' takings. The addition of a quick winning ticket checker has also made things much easier. So far the biggest prize game was 240 contestants with a £240 prize and as always the game plays without a hitch.
I also used the music bingo for a high-end Corporate Charity event for L'Oreal and Lancome and again it proved very popular, so much so they have rebooked me for another event.
After making a few changes to the code and adding his branding to the tickets and track listing sheet, I gave Wayne access to the application and shortly after, he began using it at his quiz nights with great success. Games generated with my application have been played at four quiz nights a week since early 2016 and continue to be played today by hundreds of players a week. Over 200 games of Music Bingo have now been played by real customers with thousands of players enjoying the game. During his entire time using the application, there has only been one bug found in the code which was a character encoding issue only present when running under old versions of Windows. This bug was promptly fixed when I became aware of it, with a patched version of the code being sent over as soon as the bug was fixed.
The three images below show the variation I created for Wayne's Quiz Nights (click to zoom):
Prior to using my application, Wayne used to play a similar game before his quizzes started which had to be purchased at £25 for a game with 100 tickets. This was problematic for two reasons, firstly, the relatively high cost meant that
the prize money was £25 less than it could have been, secondly, Wayne often had problems with selling too few tickets at some venues and not having enough tickets at other venues. The flexible nature of my system means that different numbers of
tickets can be generated for different venues based on popularity and disposing of unused tickets is less of an issue as only the cost of paper and ink have to be considered. Theoretically, it would also be possible to generate and print the tickets
at the venue once it is clear how many people are likely to want to play.
Using my application has enabled Wayne to give large money prizes (often over £150) enticing more people to play the game and therefore attend the quiz night, making his service more valuable to the venue as there are more people buying
food and drink.
More information about Wayne's Quiz Nights with photos and videos showing the Music Bingo tickets in use and prize winners can be found here on his Facebook page.
Technical Details:
This project was written in Python 3 and uses Tkinter for the GUI. To ensure that all the bingo tickets are unique, each of the selected songs is assigned a prime number before generating the tickets. When a ticket (of 15 randomly selected
songs) is generated, all of the prime numbers associated with the selected tracks are multiplied together and stored in a list of used ticket numbers. If a generated ticket number is already in the list of used tickets, the ticket must be a duplicate
(and is therefore discarded) as the only possible way to generate the ticket number by multiplying prime numbers is by using the exact same numbers (and therefore songs).
To generate the MP3 file, the program reads in all the clips with
FFMPEG and combines them together (with a transition sound effect between each clip) in the random order generated prior to generating the MP3. To ensure that there are no jarring differences in volume levels between clips, they are all normalized
to the same volume prior to adding them to the generated track. Once all the clips have been combined, the new MP3 is exported using FFMPEG and labelled with the correct game ID number.
The python library ‘reportlab’ is used
to generate the PDFs of the bingo tickets and track listing.
Along with the PDFs, two text files are also produced. One file simply maps the ticket number to the number generated by multiplying the primes associated with all the tracks on
that ticket - this is a simple way of storing all the tracks on a ticket without listing all of them. The other text file lists all the tracks in the game in order of their occurrence in the game along with the prime number associated with that
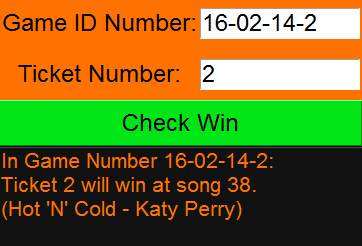
song. Both of these files allow a separate ticket checker program I wrote to work (shown below). This asks you to input the game number, and ticket number and it will tell you when that ticket will win. This means that the person running
the game does not need to check every single song on the ticket in order to check if it has won - therefore potentially saving a lot of time.
The Ticket Checker:
In order to make the game more exciting and ensure one winner, the ticket generation is not truly random. Instead, the tickets are generated to ensure that all but twelve of the tickets have at least one of the final three songs on them. This essentially means that they will not win (but this will only be clear if the order of the songs is known). Four of the remaining tickets will win on one of each of the four songs that occur before the final five. These four 'winning tickets' are spread evenly throughout the pack of tickets - this ensures that if at least the first 25% of the tickets are sold, there will only be one winner (which will not necessarily be in the first 25% if more than 25% are sold).
Example winning points for tickets in a game with 100 tickets and 45 songs:

Three of the remaining unallocated tickets will win on the fifth last song (yellow in the image above) and the remaining five tickets will win on the fourth last song (orange in the image above). These songs will win here to act as a 'safety net' in case of the unlikely event that none of the four 'winning' tickets have been sold - without this safety net, if none of the four 'winning' tickets are sold, approximately a third of all the sold tickets will win at the same time, which is clearly undesirable. As you can see in the image above, the tickets at each winning point are spread evenly throughout the (in this case) 100 tickets, making it possible for a ticket to win at any point, regardless of when the ticket was purchased - there is no advantage to buying earlier or later.
To Top
To Top
Gitlab for Coursework - Summer Internship Project
Project Description:
From June to August 2016 I undertook a 12-week summer project at The University of Manchester's School of Computer Science supervised by Dr Bijan Parsia. The purpose of this project
was to develop a web application that uses GitLab to distribute coursework assignments to students (with some starting code if required) and for completed assignments to be collected from students.
This has multiple advantages over the existing
method of coursework distribution and collection (through Blackboard) as the existing method requires compressed code to be downloaded, extracted, worked on, re-compressed and re-uploaded. Gitlab allows repositories to be cloned, worked on and seamlessly
pushed back to the repository for marking. This provides students with the experience of using Git version control as part of their workflow - invaluable knowledge for students going to work in industry or on personal projects. Using GitLab also has the benefit of not actually requiring assignments to be submitted by students as the latest commit on the project (before the deadline) can be used as the submission.
The application was primarily created for use by my project supervisor in the teaching of his software engineering course unit but was designed to be accessible by any student and member of staff in the school for use in any course unit. A similar system already exists for GitHub called GitHub Classroom, however, after researching this application further, it was found that it is very limited in terms of its capabilities
and would not be ideal for distributing and collecting students' assignments.
The application I created used a Python Flask web server as a front-end usable by both students and staff to view information about assignments, with students only seeing their own assignment details and staff seeing the assignments
of every student enrolled on a course unit. The university's GitLab server was controlled (via the GitLab API) by the web server to create new projects with starting code and for students to fork the initial assignment into a new project
accessible by the student and members of staff on the course unit.
The forking and sharing of projects was achieved as shown in the diagram below:
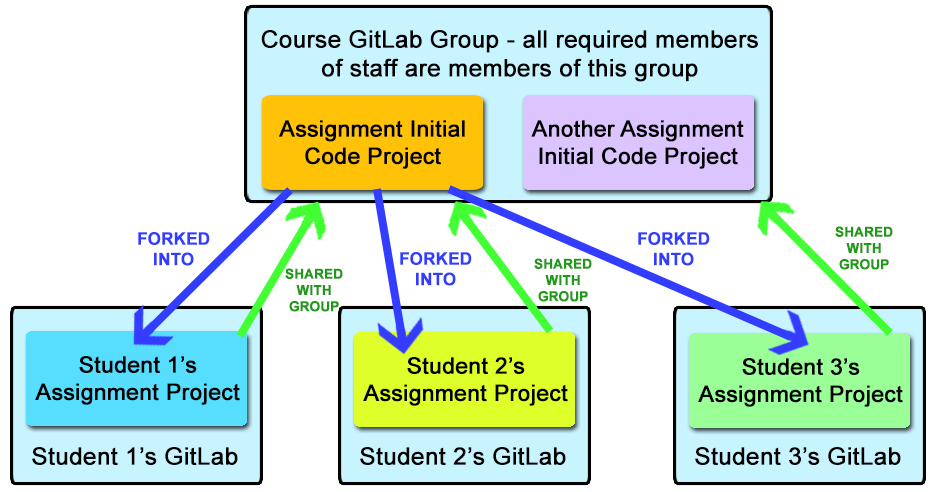
After the assignment becomes available to students, each student on the course will be greeted with the option to fork the assignment into their own GitLab project (access to which is shared with staff on the course) which can be cloned to their personal computers and worked on. The student can push their changes to the initial code back to GitLab as many times as they work on it but the final commit they push before the deadline is taken as their submission. Any commits after the deadline are ignored (though in certain situations it is possible to accept a late submission if requested). After the deadline, any staff with access to the course unit will have the ability to download the last commit before the deadline of each student on the course and assign the student a mark out of specified maximum mark.
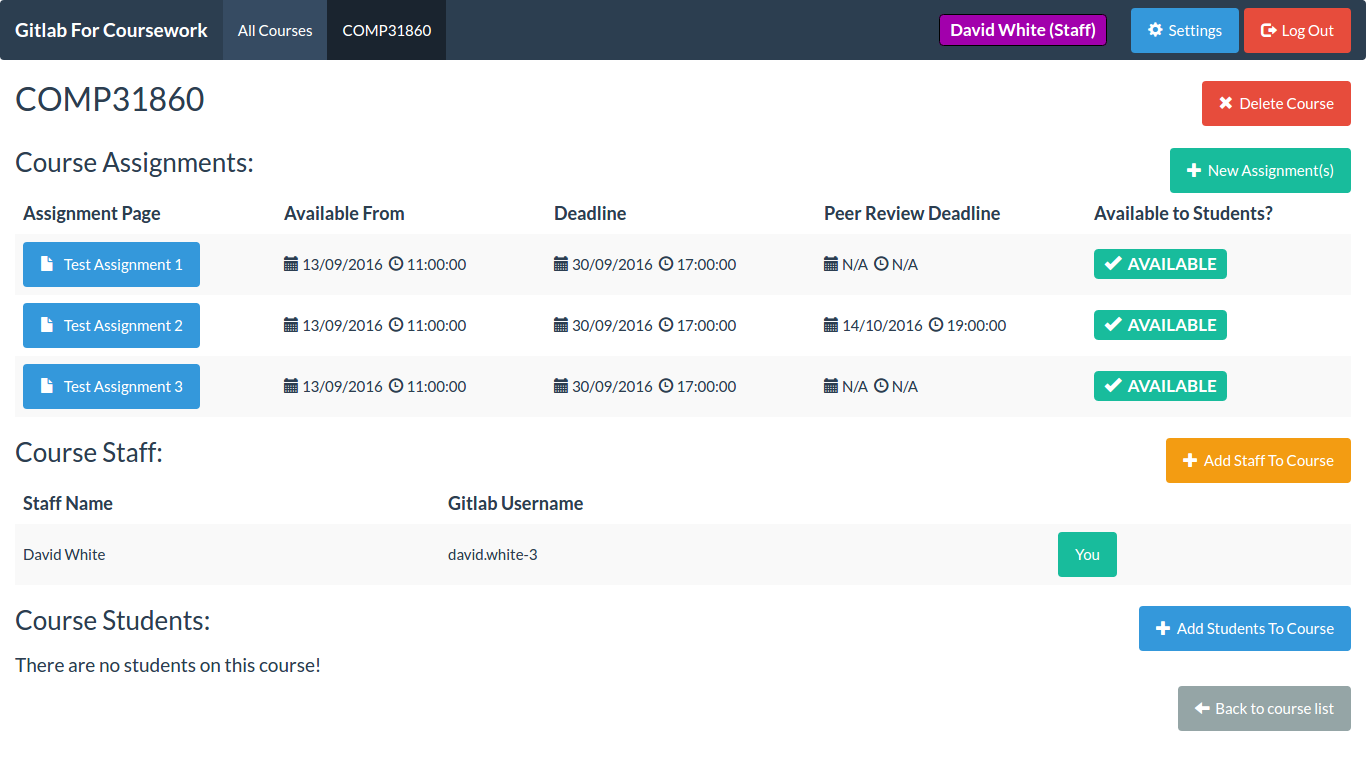
An example of a course page shown to staff able to access the course unit showing a list of assignments, staff and students with options to see more information about the assignment and to add and remove staff/students:
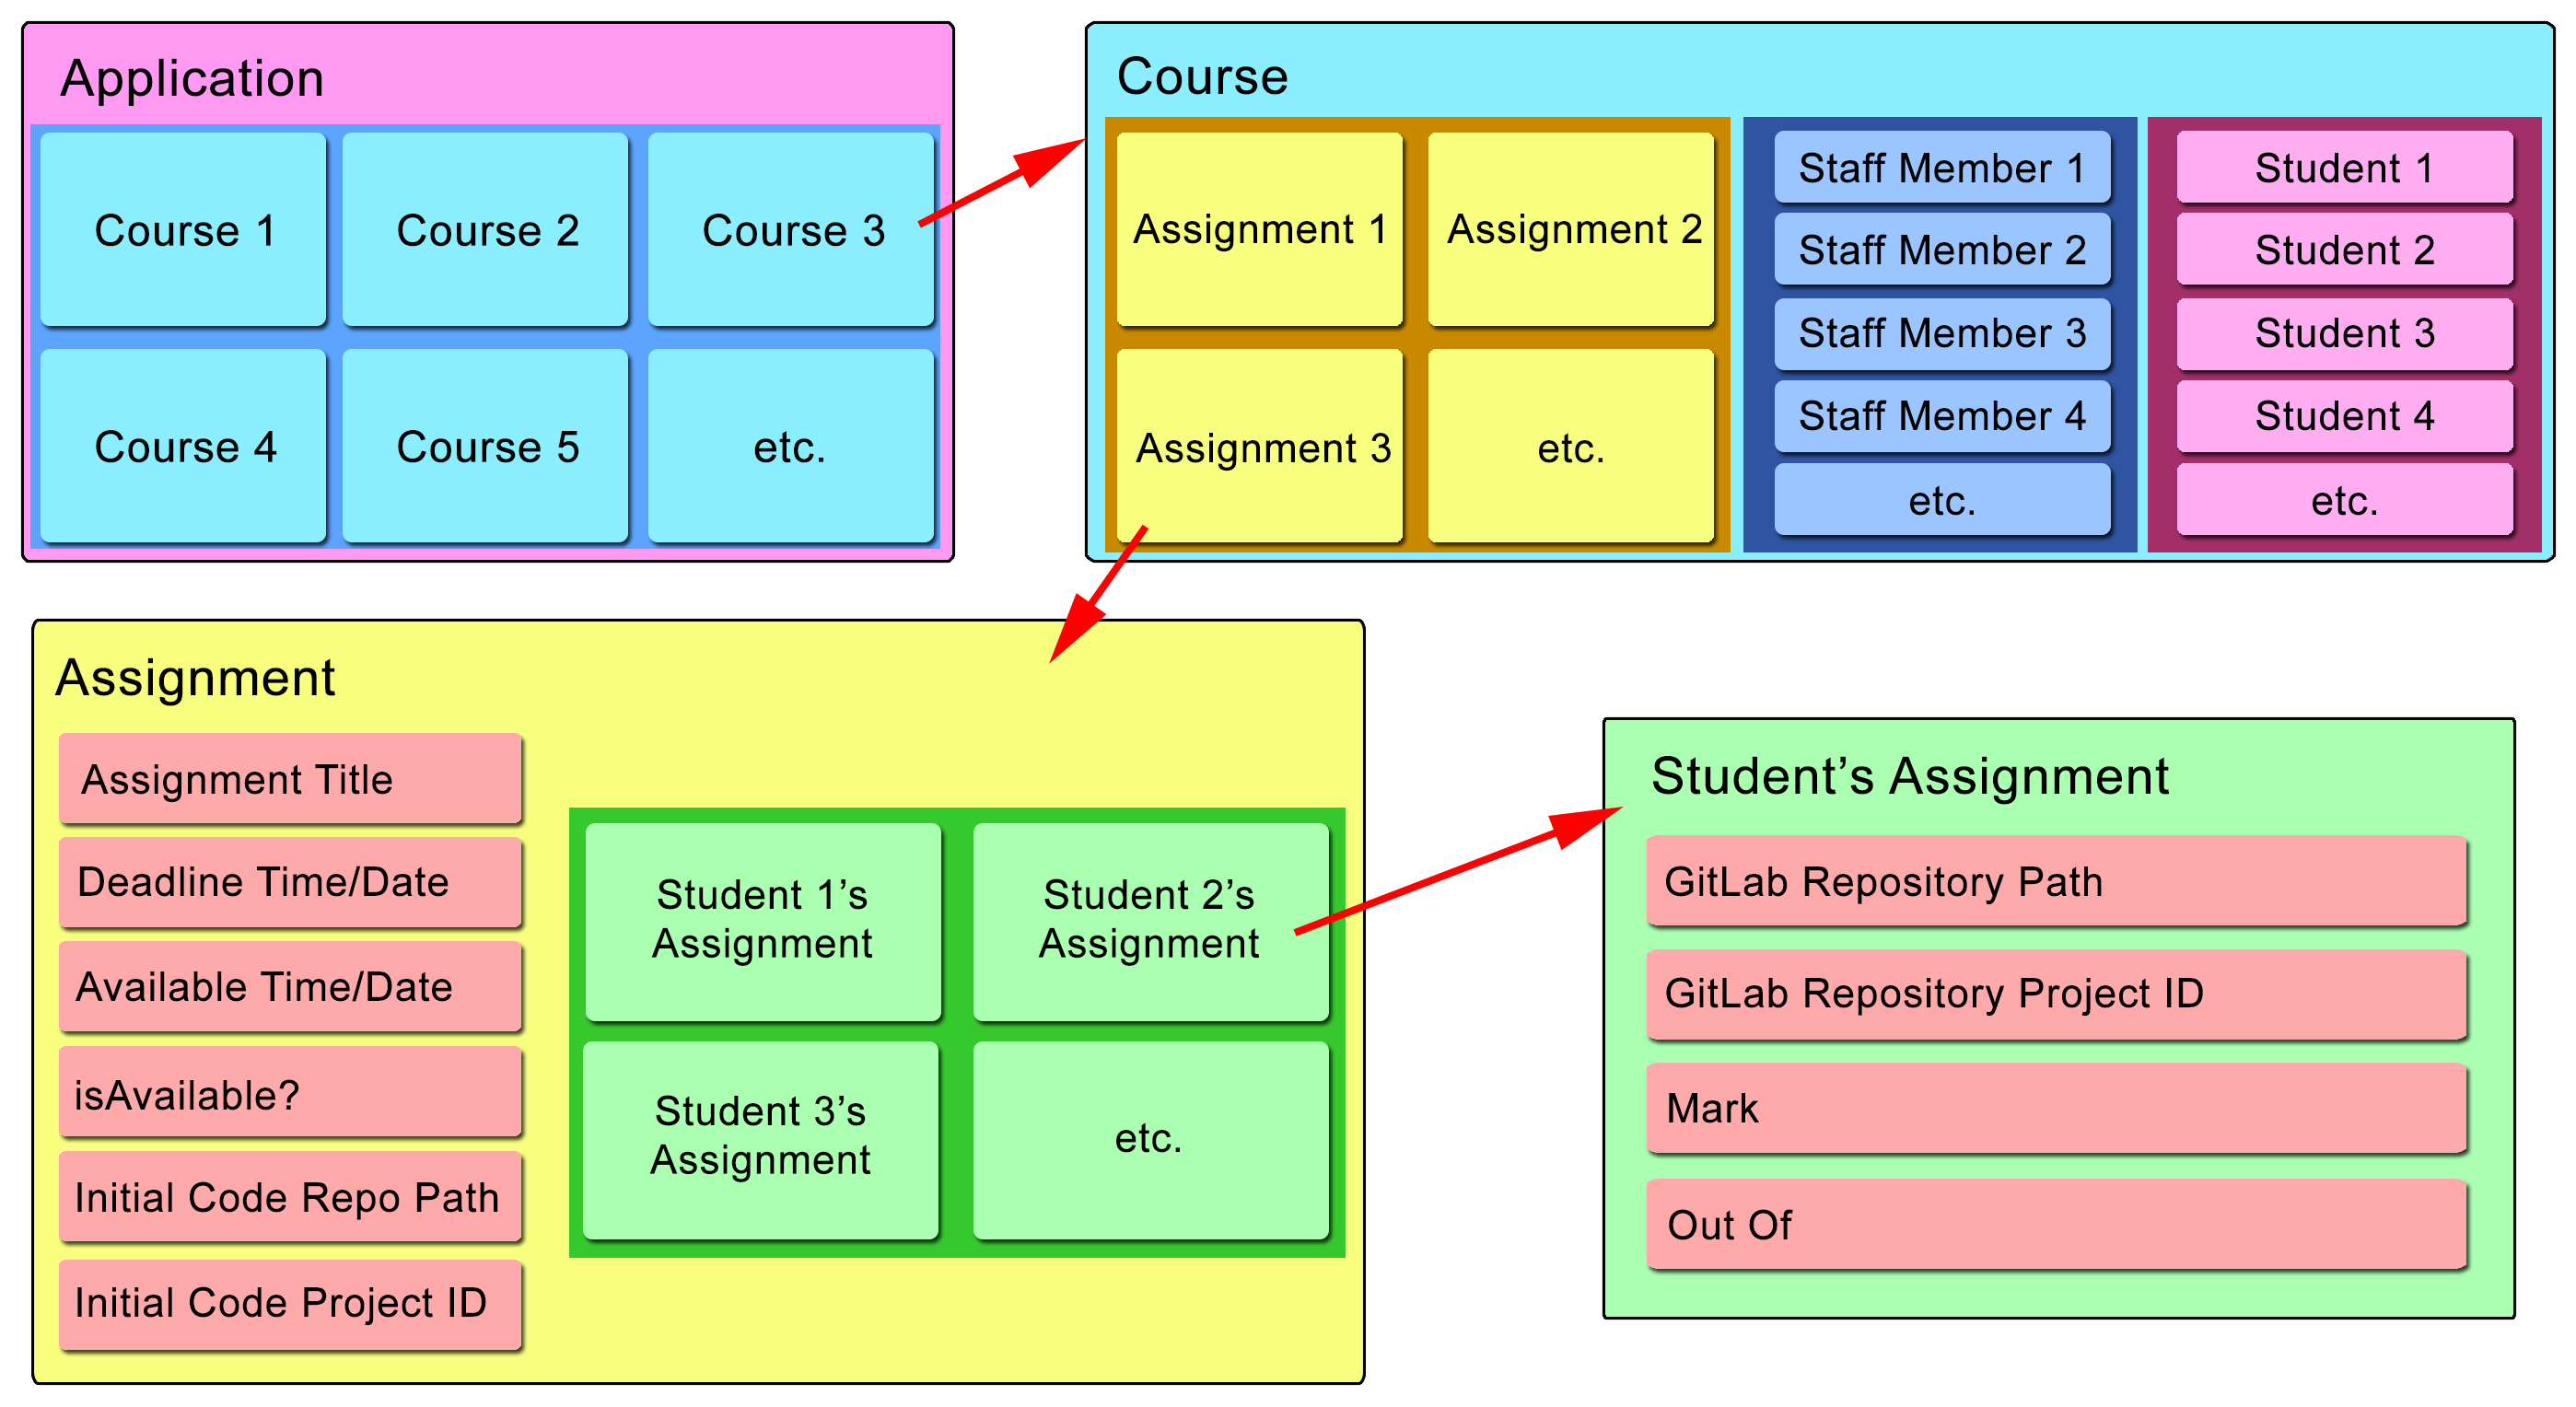
The general structure of the application including some of the information stored in the database about each element (either information visible to the users or used in interactions with the GitLab server) is shown in the image below:
After implementing the main functionality of the application, I started working on additional features that were requested by my supervisor. One of the features requested was the ability to allow students to peer review assignments written by other students after the deadline has passed. After the deadline, students will be greeted with the option to peer review a randomly selected (from the remaining non-peer-reviewed students on the course) student's code (which will be anonymous to lessen the risk of collusion). Students will have until the peer review deadline (specified by staff) to review the code they have been given.
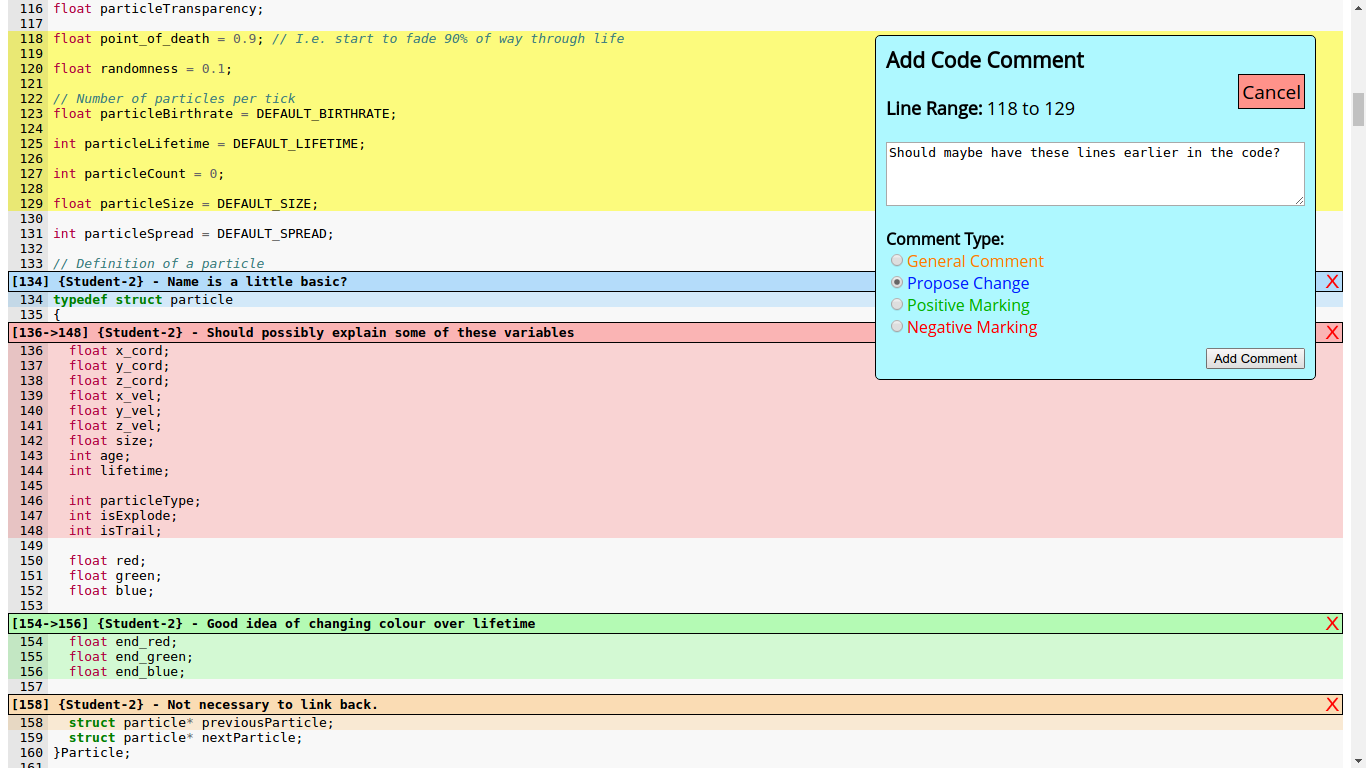
Although specific code review tools exist such as Review Board, it was determined that it would be better to design a code review tool from scratch that would be capable of accessing GitLab data directly rather than requiring students to use another separate application. After discussing the system with my supervisor to be clear on the specific functionality of the tool and how students are matched, I implemented a code review tool which can be seen in the image below. The tool highlighted the syntax in the code and allowed students to select one or multiple lines and for specific comments to be written about the selected lines, including a comment type indicated by the colour of the lines.
A screenshot of the peer code review tool in use showing example comments highlighted:
After the peer review deadline had passed, students will gain access to any peer review that has been performed by other students (typically only one student, but in the case of an odd number of students, it may be two students). This provides students with experience performing code reviews on real code and gives them worthwhile comments on their own coding style or problems within their code. Staff will also be able to view the peer review performed by each student and assign a mark based on the quality and quantity of the student's comments.
One feature of the application that was discussed but never fully realised was adding the ability to support group assignments with the application. Some time was spent developing code which would allow useful information to be displayed to staff showing the number of commits, additions and deletions performed by each member of the group. This would be useful as a simple metric to see whether the workload of the group was approximately balanced between each of the group members - though obviously, this would need to be investigated further before adjusting the weighting of marks in a group as there could be a legitimate reason for the lack of contributions.
Sadly, due to lack of further development time, this feature was never fully implemented into the system, though little further development would be required to add the feature. Despite this, my supervisor was very pleased with my work throughout the project and was very interested in me continuing work on the project at a later date, if further funding became available for it.
Technical Details:
As previously mentioned, the application was hosted on a Python Flask web server - programmed in Python 3. Data stored about courses, assignments, students, staff, peer review comments and data required for GitLab access was stored in an SQLite database. SQLite was initially intended to be used only during development of the application due to its ease of use and later replaced with a DBMS more suited for concurrent database accesses such as MySQL. Unfortunately, this was not replaced by the end of the project which could be problematic if too many users wish to use the application simultaneously. However, as the application was only initially intended to be used by classes taught by my supervisor (less than 50 students), the issues with the SQLite database are unlikely to be too much of a concern.
The GitLab API was used for all transactions with the GitLab server with OAuth2 authentication being used to identify the user performing the operation. Students and staff using the system are required to perform a one-time setup by setting up an application key within their GitLab account - this is very simple to do and should not cause any concern for students/staff in the School of Computer Science. In order to simplify GitLab API transactions (performed via specific HTTP requests), a Python library was written to abstract the complexity of the underlying network operations away from the main programming.
Authentication (to verify the student's identity) was achieved via the University's central authentication service (CAS). This meant that a secure login system did not need to be created and determining whether the user is a student or a member of staff was trivial. To simplify development, I used a CAS proxy service hosted in the School of Computer Science rather than directly interfacing with the authentication service - I did make several requests for direct access during my time developing the project but never received a reply (possibly due to the project taking place over summer meaning less staff to deal with communications). Shortly after starting to use this proxy service, I noticed a security flaw which would allow anybody to log in as whoever they wish. I contacted the developer of this proxy service and explained the security problem and how it could be exploited and it was fixed shortly after.
In order to increase the speed of adding students and staff to courses, an option was developed to enable the uploading of CSV files to the server which were parsed by the server. After parsing the file, the server automates the process of adding students or staff without any further human intervention.
In order to automate the availability of assignments to students, it was necessary to run a separate thread which is aware of the "available from" times for each of the assignments and will automate the process of making the assignment available after the starting time has passed. This method was a little problematic as communication between a separate thread and the main application thread is a little hard to achieve. However, after spending some time looking at the possible options for multithreading, I was able to produce a working solution that did not cause a significant slowdown to the server.
The Pygments Python library was used to perform syntax highlighting on the code to be reviewed by students. This library performed very well at syntax highlighting and output the code directly in HTML, which was very useful. However, one issue with the library was that the output HTML was not suitable for use with JavaScript to highlight the code to make comments. To circumvent this issue, I wrote code to process the generated HTML code after it has been generated to add identifiers and to alter tags to convert the code into a form suitable for control via JavaScript. This method proved to be very effective and the Peer Review tool worked very successfully.
To Top
To Top
Facial Recognition Door Entry System - Third Year Project
Project Description:
The aim of this project was to develop a door entry system which uses facial recognition to determine whether to grant a user entry or not. To achieve this I decided to use easily available and low-cost hardware including a Raspberry Pi and
RPi Camera. This project constituted approximately a third of my third-year university grade and was completed over two semesters (including research, planning and evaluation phases and time spent writing reports and delivering seminars).
For this project, I received a first-class mark and gained valuable experience in managing large individual projects including keeping up-to-date logs and compiling relevant research documents for easy access.
One issue with facial recognition
is its poor performance under different lighting conditions to the lighting conditions used to train the classifier. To remedy this, my system used four lights positioned above, below, to the left and to the right of the camera - angled towards
the subject. These lights were used in training to simulate 16 different lighting conditions on the users face with a photo of the user being captured in each of the lighting conditions. This greatly increased the performance of the system under
differing lighting conditions. The lights were also used to illuminate the user's (who is trying to gain access) face when the system is uncertain of the identity of the user - this provides more even lighting on the face which increases the likelihood
of the user being identified correctly.
The lights were also used as a security feature to reduce the likelihood of a photograph of a face being used in front of the camera in place of a real face. This security feature works by quickly taking 3 photos of the user - one with
all lights off, one with the left light on and another with the right light on. These captured images can be used to calculate solely the effects of the lights on the user's face - with a real face, there will be prominent shadows cast by the user's
nose, which will not be present if a photograph is used instead. This process is discussed further in the screencast below.
In order to track the usage of the system, a web server was hosted on the Raspberry Pi which could be accessed by other computers connected via the same network. The web server hosted a log which displays every attempted access, whether
access was granted or not and the time/date of the attempt. This is discussed further in the screencast below.
For this project, it was necessary to build structures to hold the camera and lights in position and a small door frame with a door whose position could be controlled via a servo. It was also necessary to secure LEDs to the structure and
solder wires to connect them to a microcontroller.
This project was challenging and intriguing as it required code to be written at multiple levels including high-level machine learning algorithms down to writing micro controller code used to control the lights and door operation.
The video below was produced as a coursework deliverable for my project and explains the general operation of the system and reasons behind design decisions:
Technical Details:
As mentioned in the video above, the three main hardware components of this system are a Raspberry Pi 2 Model B, a Raspberry Pi Camera and an ATMEGA328P microcontroller. To save development time, elements of the OpenCV (Open Source Computer Vision) library were used to locate and crop faces within the captured frames. Classifier objects from the same library were used to train the system to recognise the located faces and to determine how likely a newly captured
face is the same as one already known by the classifier. The main programming language used in this project was Python 3 - this was selected as I am very familiar with Python, it easily runs on a Raspberry Pi, there are simple libraries available
to interface with the Pi's GPIO pins and as the majority of the processing time would be utilised by the OpenCV library functions (written in optimized C/C++), using a faster language such as C would not provide a significant speed increase.
It was necessary to use a separate microcontroller to control the lights and door operation as the Raspberry Pi is not capable of producing hardware PWM (pulse width modulation) signals and producing PWM through software would use valuable
processor time. Communicating with the micro controller was achieved by using a 2-wire I²C interface and various custom-made codes sent as bytes to be translated by the micro controller.
The microcontroller was used to generate PWM signals to vary the intensity of each of the four lights and to control a servo to open/close the door which requires a PWM signal to specify its orientation. In order to control the system without
the use of an external monitor or networked computer, I added a button with multiple functions dependant on the duration of the press and a small HD44780 16x2 character LCD screen to give visual feedback to the user about the operation of
the system.
The web server log mentioned above was hosted via an Apache2 web server with the simple page being generated via PHP. The log is populated by accessing a MySQL database (hosted on the Raspberry Pi) and retrieving
all the data stored for each access. For each attempted access, the system generates an entry in the database with all the information relevant to the access. Every attempted access also saves a photo of the attempted access, a path to which is
stored in the database entry.
To Top
To Top
Controllable OpenGL Particle System
Project Description:
This project was part of my Advanced Computer Graphics course unit in the first semester of my third year at University. We were tasked with creating a particle system which could be controlled and adjusted in real-time. The program I have created allows you to control many parameters including start and end colours, particle lifetime, particle birth rate, velocity, gravity strength, particle style (rendered as points, squares or stars), particle size, the spread of the particles and explosions (on death) and particle trails. I also implemented a dedicated 'fireworks mode' which can be seen in the middle GIF below.
Some examples of what can be produced with this system are shown below:


Technical Details:
This project was written in C using OpenGL and GLUT for the rendering of the world and particle system. All the information about the individual particles was stored in a struct called Particle. To allow for the easy addition
and removal of particles to the system, each Particle struct contained pointers to both the previous and next particles - creating a doubly linked list of particles.
When the particles hit the ground plane, they bounce off
at a dampened velocity, dictated by a parameter in the program. This is achieved by checking (at every tick) whether the particle will go below the ground level in the current tick (by comparing the y coordinate of the plane with the y coordinate
+ velocity of the particle), if the particle will go below, the y coordinate is set to be equal to the ground plane and the y velocity is reversed and scaled down.
To create the particle trails, after each tick, the particle emits another
smaller particle behind it which has a very short life - when in motion, this gives the effect of a trail behind the particle with the same shape as the particle.
Explosions are created in a similar way, where on death, several particles with
short lives are emitted from the point of death in every direction, this creates an explosion effect on the death of a particle.
To Top
To Top
Image Organizer Web Application
Project Description:
This web application allows users to upload images to their personal gallery and add tags to each image which can be used to filter the gallery to display only images tagged with a particular term. This is a personal project that I undertook to demonstrate my knowledge and abilities in creating web applications with Python Flask and other web development technologies. Through developing this project I have expanded my knowledge of Python Flask and learnt new techniques and skills that I can use in future projects such as session management and restricting access to resources. Although the user interface is relatively simple, the application shows that I have a solid understanding of developing applications with Python Flask. The application resizes well (albeit with some elements being a little large) which means that it is usable on mobile devices.
The video below showcases the main features of the application:
Technical Details:
As previously mentioned, the application uses the Python Flask web framework to host the application.
Other technologies that are used are:
- An SQLite database with a table to store users' log-in details (with passwords only stored in a hashed + salted form), a table to store the paths to the images and owners of each image and a table to store tags for the images.
- CSS3 is for the styling of the elements on each page.
- JavaScript is used to display and control elements on pages - for instance, to correctly display the boxes to delete images or tags (with the buttons performing the correct functions).
- Bootstrap is used throughout the application for certain buttons, containers and forms. This increases the compatibility with mobile devices as it increases the likelihood that elements with be resized correctly.
- The Python module 'Pillow' is used to create thumbnails of the uploaded images which are displayed in the gallery to drastically reduce the loading time of the gallery.
This project is still in development and there are some known security flaws - including the fact that a secure connection (via HTTPS) is not established with passwords being sent as plain text. The application is also vulnerable to session
hijacking.
To run the project, some modules may need to be installed. (such as Flask and Pillow)
To Top
To Top
Train Station Live Departure Board
Project Description:
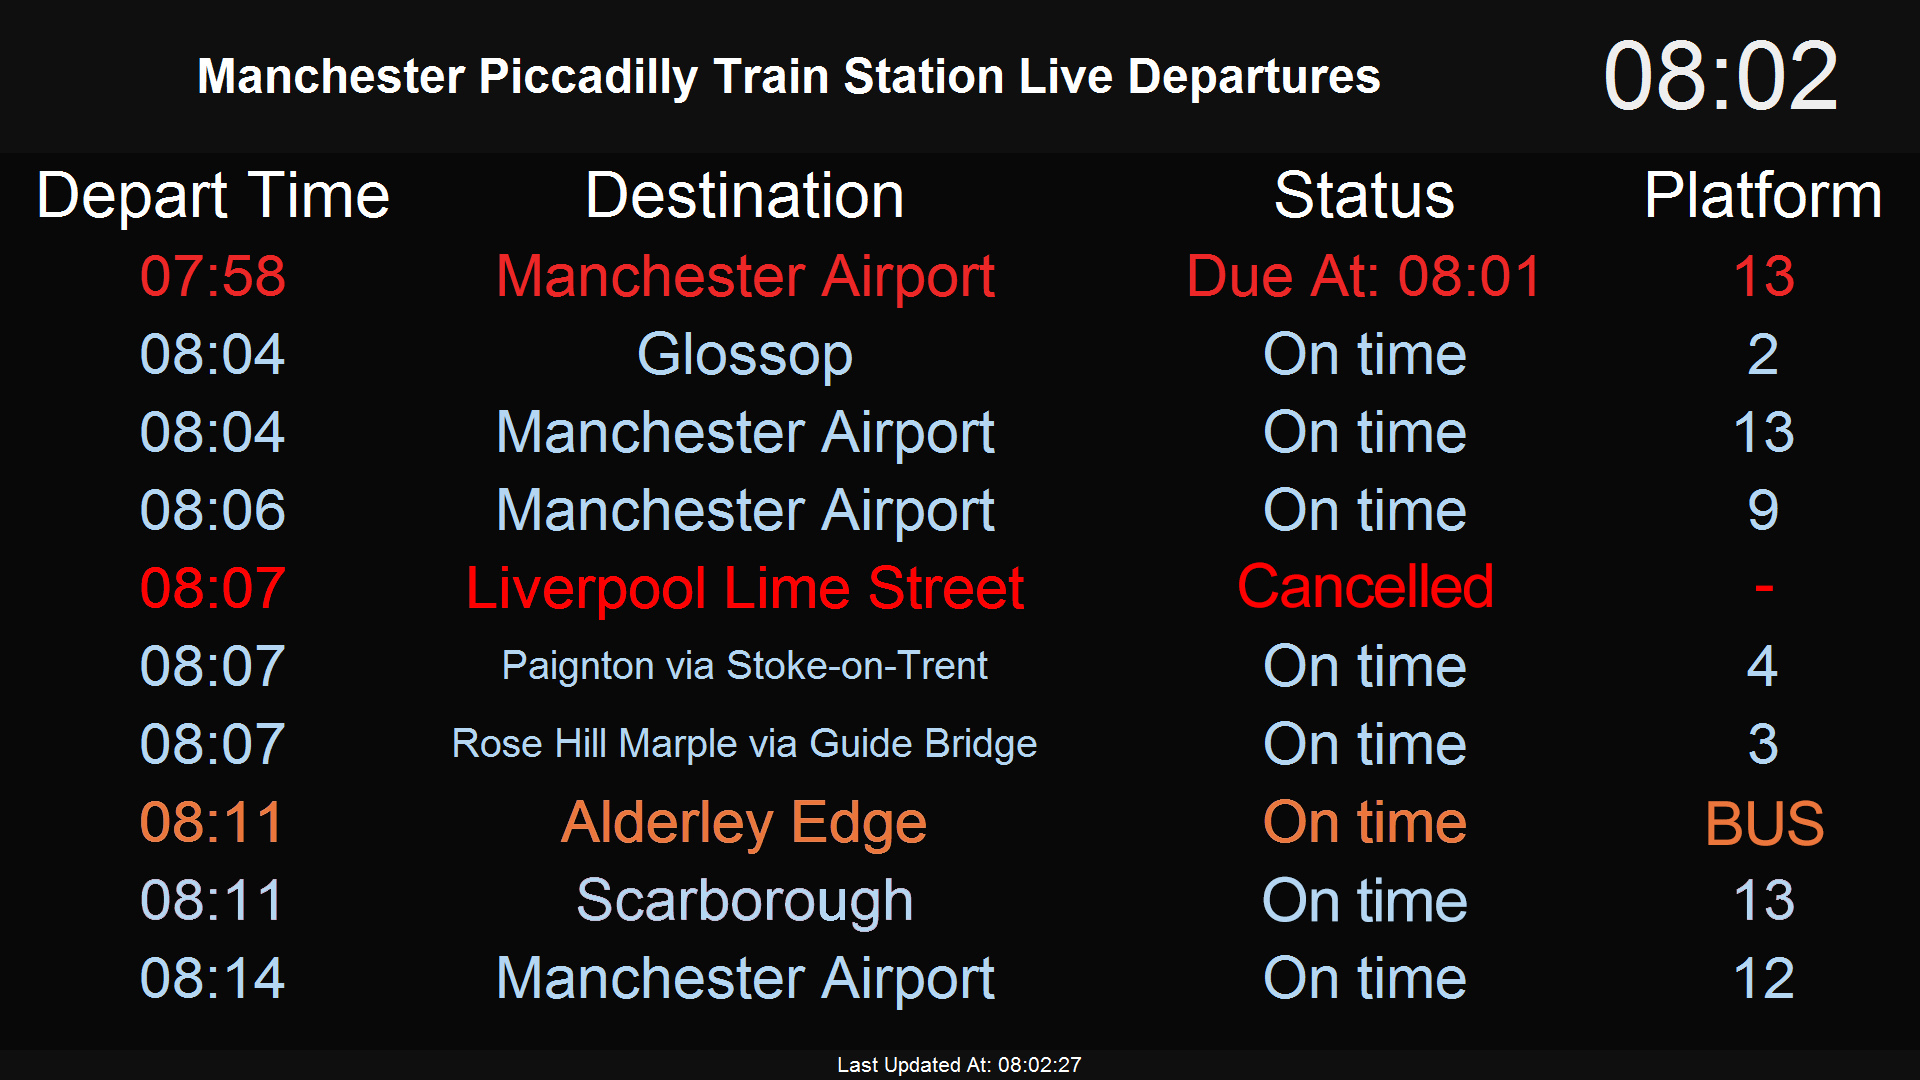
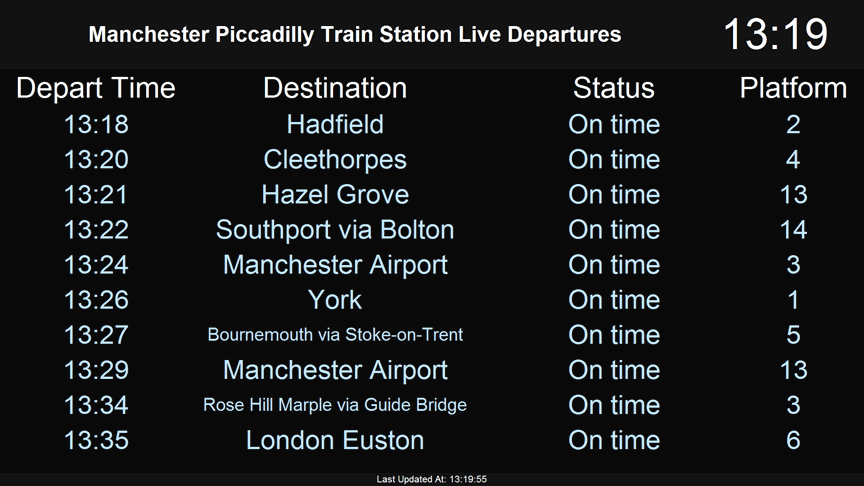
This program is a full-screen live train station departure board which could potentially be displayed on screens in venues close to train stations (such as pubs and restaurants). This would give customers a real-time view of the station departures, giving them an easy way to see when their next train is and decide when to leave. As you can see in the image below, any alterations (such as delays and bus replacements) to the scheduled service are shown in different colours, this makes the alteration clear to the customers. In addition to the departure board, the program will periodically alternate to display advertising screens at a pre-defined interval. This will allow the venue to also use the screen to display any promotions they may wish to show to customers in addition to the train times. This was a personal project that I created as I wanted to try building an automatically updating display which used live data taken from an external source.
The image below shows a typical departure board with any alterations to the scheduled service being shown in different colours. With light red indicating a delay, pure red indicating a cancellation and orange indicating that the service has been replaced with a bus:
The GIF below shows an example of the advertising screens in use:
(For illustration purposes the process is 10x faster than usual)
Technical Details:
This project was written Python 3, using Tkinter for the display. The live train station departure data is accessed using the National Rail's Darwin SOAP API (found here). This API allows you to easily retrieve data from any train station run by National Rail - including live arrival and departure boards. To use the Darwin API, one must first sign up for the service and be assigned a unique API key. In my program, I am using a python library (nredarwin) to handle the communications with the server (such as the construction of the messages sent to the server). To keep the data up-to-date, the data is refreshed every 45 seconds. As Tkinter supports PNGs natively, the advertising screens must be in a PNG format to work. The resolution of the advertising screens should match the resolution of the display.
To Top
To Top
Website Development Projects
Supernova Visuals Website
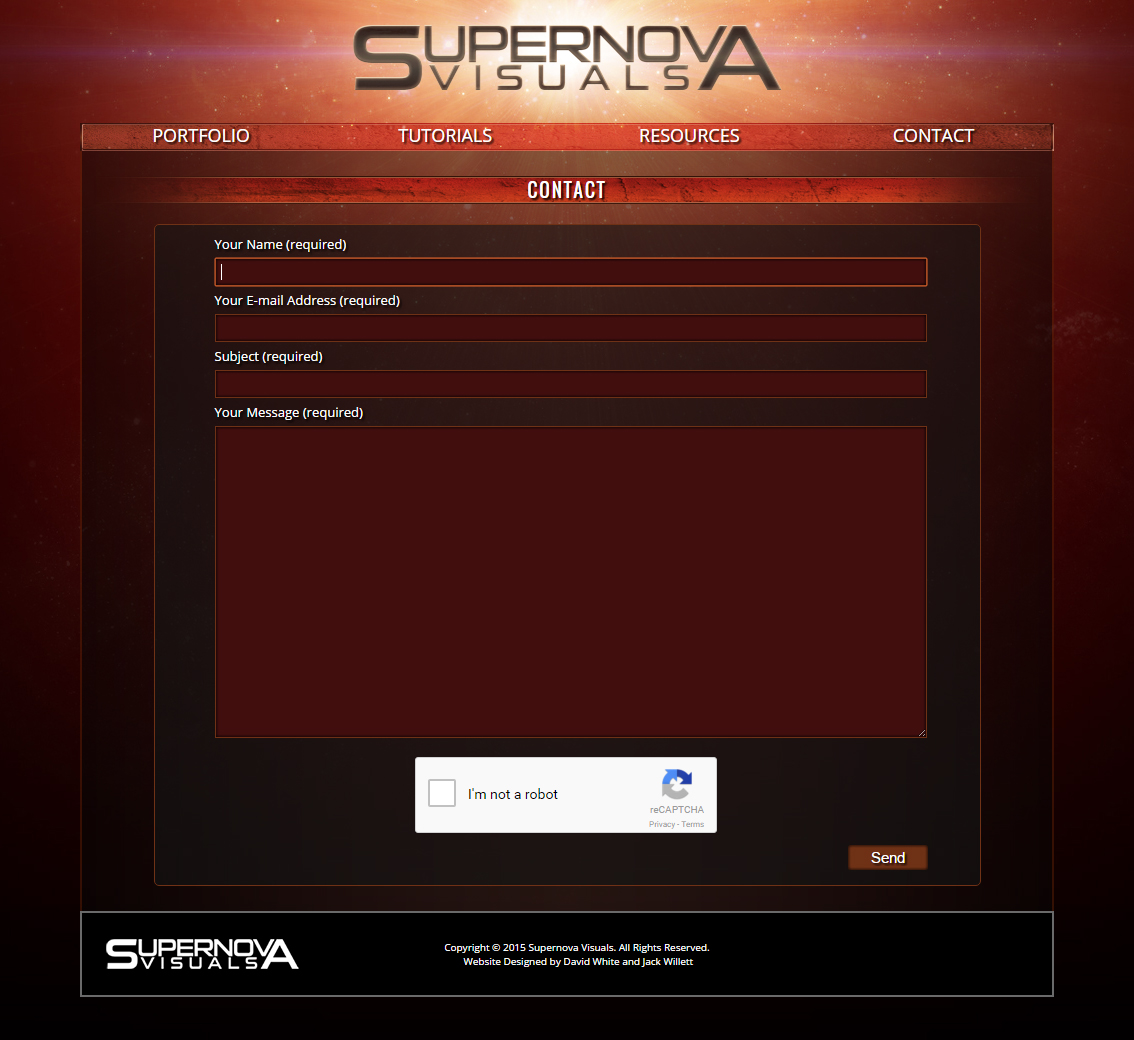
In 2015, I started developing a website for a friend to showcase his visual effects projects and host tutorials and VFX resources. Sadly the website was never completed as it was no longer required due to various unfortunate circumstances. Before the project was cancelled, there were a few pages that were completed. One of these pages is a portfolio page, a copy of which can be found here (many links will lead nowhere). Another page that was completed was the 'Contact' page which can be seen below. This page allowed visitors to send messages directly to our e-mail address using a form. To ensure that the visitor was human, I used reCAPTCHA which required me to use the Google reCAPTCHA API to determine the authenticity of the visitor. The e-mail message was constructed in PHP by taking values from the form. The page cannot be hosted (in a working state) on GitHub as PHP code will not be executed by the server hence why only a picture has been shown.
The Supernova Visuals Contact Page:
Student Survival Guide Website
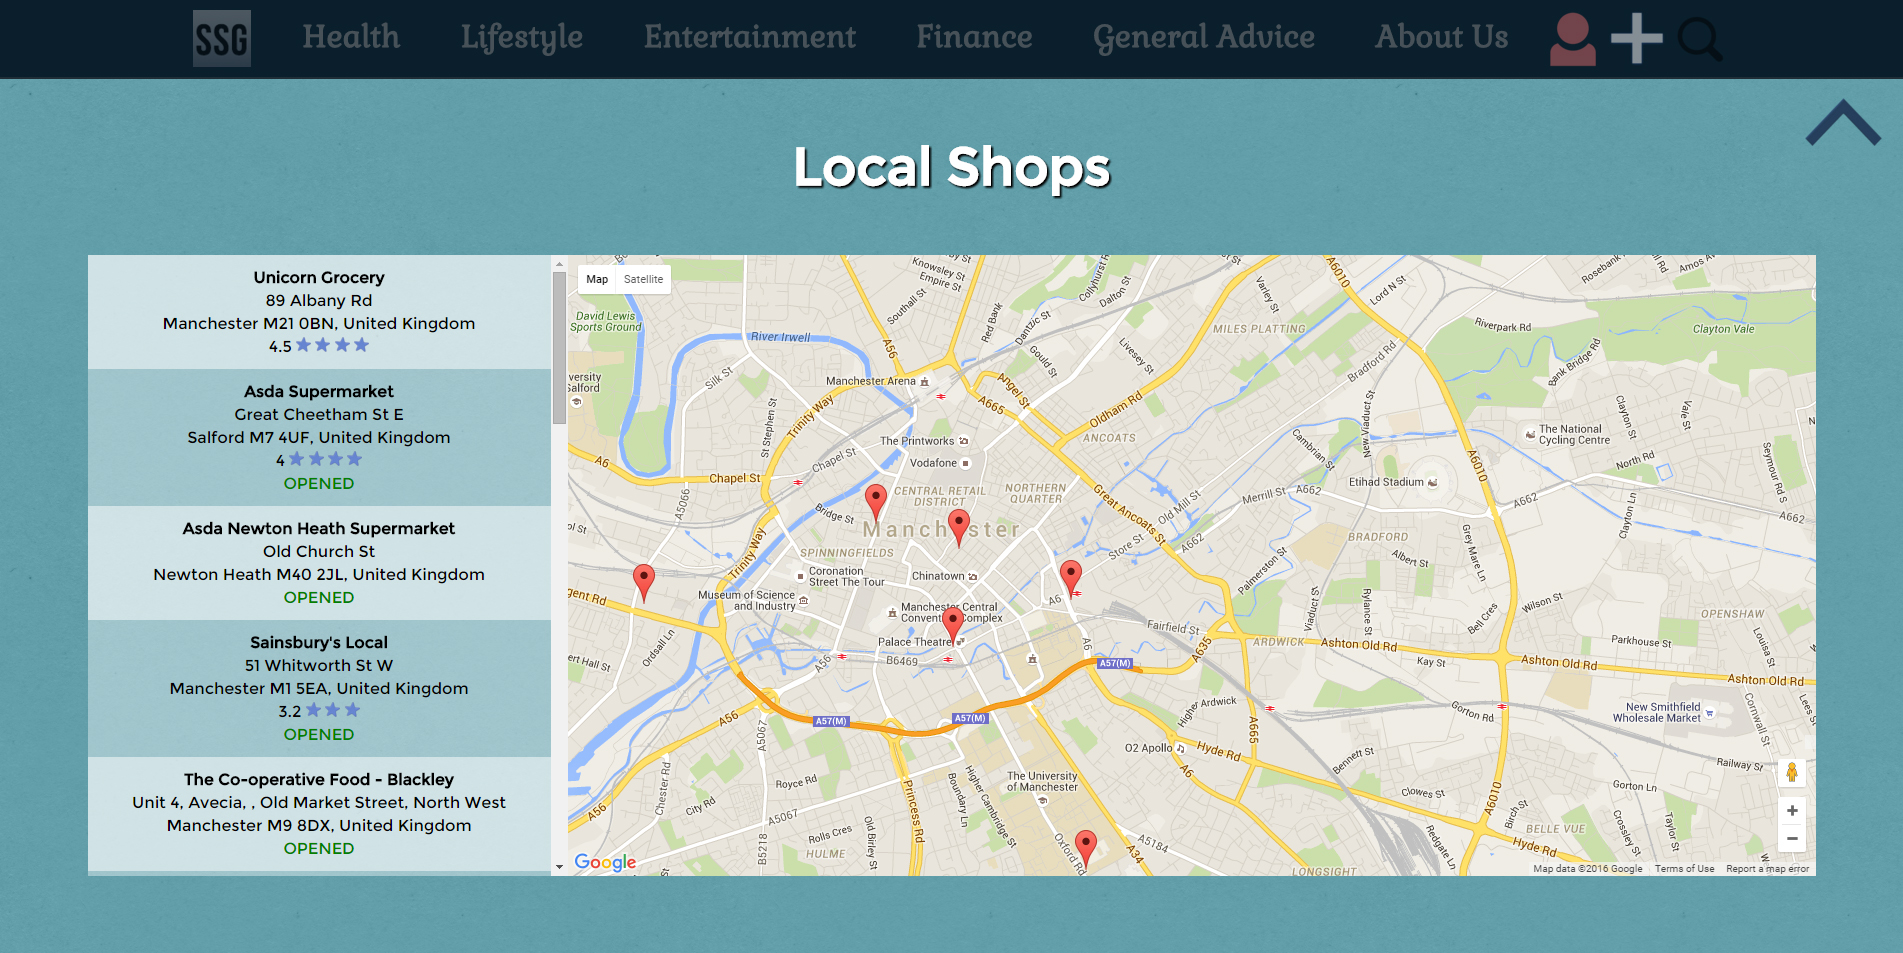
This website was created as a group project in my First Year at University. The website gave students information about the local area - including the locations of hospitals, cinemas etc. and allowed users to post their own recommendations of venues in the form of article pages. My main coding contributions to the site were creating the login system (where users could create an account and log in), creating the article comments system (where logged in users could post about the topic), creating the article like/dislike system, creating the template pages for the articles and website sections, creating the overall website styling and the sourcing/editing of royalty-free images.
Some screenshots of the Student Survival Guide website:

This Portfolio Page
The latest web page I have developed is the page you are reading right now. All of the code on this page was written entirely by me (aside from the use of the jQuery library for the smooth scrolling links) and all images/videos were also generated by me.
To Top